This appears to be some good info on preventing wet basements that I came across that could be of some value to our community residents.
Checklist
 If your basement is wet, please, please, PLEASE read the following before you call in a basement waterproofing contractor:
· Most basements get wet when rainwater runs toward the walls of houses from roofs, yards, and driveways. The first step to eliminating the invasion of water is to force it to run away from your home. Repairing gutters, extending downspouts, and/or grading the soil around your house will clear up most problems at a minimal price.
· If these simple fixes don’t work, get an independent opinion from a drainage specialist or home inspector with expertise in drainage issues (see our Home Inspectors section for ratings of home inspection services). You’ll have to pay for an inspection, but a competent inspector’s advice may save you many times the fee.
· Focus on solving the problem from the outside. Many basement waterproofing contractors want to sell costly interior drainage systems with sump pumps—even if you don’t need it. If built properly, these systems will keep your basement dry, but this work typically is unnecessary and doesn’t really deal with the root of the problem. The best solutions prevent water from reaching the walls of your home; interior systems manage water only after it has entered the building.
· If your home was built within the last few years, check the builder’s warranty for clauses on seepage.
Don’t ask a basement waterproofing contractor for help until you are absolutely sure you need one.
If you do need to hire a contractor, meet with and obtain proposals from several companies. Many landscaping companies specialize in drainage work. You can get some insight into companies’ performance by checking the ratings and comments posted by area consumers in our Basement Waterproofing and Landscapers sections. Among basement waterproofing contractors, big differences exist in the quality of advice provided. Avoid companies that use aggressive sales tactics.
Calling a basement waterproofing contractor to fix a wet-basement problem should be your last resort. Many of these companies will propose installation of expensive interior drainage systems—even if you don’t need one—when most moisture problems can be solved through less expensive means. Some companies also resort to aggressive, and even deceptive, sales tactics to try to close deals (we describe here the sales jobs inflicted on CHECKBOOK’s editor by two of the area’s largest basement waterproofing companies).
If you have a basement water problem, you want it solved quickly. But you’re more likely to get good results—and save a lot of money—by exploring all possible solutions and paying for professional help only if you need it. This article suggests possible solutions that cost far less than the work recommended by most basement waterproofing contractors.
If you want more good advice, hire a home inspector or drainage specialist to examine your problem and suggest solutions. Inspections cost up to $300, but could save you many times that amount. For ratings and reviews of area home inspection services, see our Home Inspectors section. When contacting inspectors, make sure they have experience solving drainage issues.
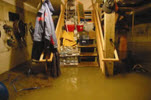
Most serious basement moisture problems occur when water leaks or seeps through basement floors, through joints between floors and walls, or through walls below ground level during or after rainstorms. In extreme cases, this water may enter in visible rivulets and accumulate several inches deep on the basement floor. In the mildest cases, it slowly seeps through porous wall or floor materials, creating slightly damp walls or floors.
To understand why this kind of leakage occurs, think about how a house is constructed. The first step is to dig a hole. If nothing more is done, this hole will fill with a substantial amount of water during every rainfall—from water falling directly into the hole, running in from the surrounding surface, and seeping in from surrounding soil. The bottom and sides of the hole may hold some water for a long time, like a giant bowl.
Now assume that built inside this bowl is a house that doesn’t quite occupy the entire bowl. How do you keep water that accumulates in the bowl out of the house? A lot can be done, but often the diligence of the builder and local building codes dictate what is actuallydone. Let’s assume the builder is conscientious—
· The builder backfills the hole with clean soil around the foundation to fill up the remainder of the bowl. A good builder makes sure no wood, masonry, concrete, or other debris gets into this hole, and the builder packs the fill dirt as tight as possible. But regardless of the care taken to backfill, fill dirt will be less compact than the undisturbed dirt surrounding the hole (if the builder packs the dirt too tightly, it might push in the home’s walls). As a result, the bowl, like a full bowl of dry cereal, can still hold a lot of liquid.
· To minimize the water that gets into this backfill area, a careful builder raises the backfill high enough to create a slope that will carry water away from the house. Building codes usually require six inches of slope for the first 10 feet of ground, but better builders grade one foot of slope for the first six feet of ground, to allow for settlement of the soil over time. If the grade is adequate, most rainwater will run off the surface and away from the house before it soaks too far into the fill.
· The builder tries to make the house watertight by making sure the basement floor and foundation walls have no holes or cracks, and tries to make sure that cracks will not develop as the house settles and changes with age. The tightness of the house is enhanced by parging and/or damp-proofing the foundation walls—applying coverings of cement mortar, bituminous coating, plastic vapor barrier, drainage board, or other materials to the walls.
· A drainage system is installed around the outside and/or inside perimeter of the foundation. Most building codes now require that all new homes be built with exterior drainage systems, whether they need them or not. Sometimes the builder may simultaneously install drainage systems on both the outside and the inside of the foundation, and connect the two systems together (some jurisdictions require this step, too). Perforated drainage pipes are set below the level of the basement floor or alongside the footing. The pipes are surrounded by coarse gravel and, depending on the type of soil, may be covered with a filter fabric to keep dirt from clogging the system. The pipes collect water and drain it off to a public stormwater sewer or an open area where the slope will cause it to flow away from the house, thus keeping the bowl empty below floor level.
· Some builders limit the direct rainfall on the fill area by extending the roof of the house out beyond the walls.
· Sturdy, properly sized, and properly slanted gutters are installed and gutter downspouts are extended to carry water well away from the house. This ensures that rain falling on the roof—in the middle of the bowl—is carried out beyond the edge of the bowl. Gutters are set high enough so that water rushing down the roof in a hard rain does not cascade beyond the outer edge of the gutters.
With this picture of topnotch building practices in mind, you can easily imagine how a wide range of things could go wrong and let rainwater leak into your basement.
Some trouble areas originate during construction. Drainage systems that are unprotected during construction can get crushed or filled with dirt. Other construction-related problems occur when builders neglect to install gutters properly, fail to damp-proof walls, or improperly locate exterior drainage.
More commonly, problem areas develop over time—even in the most carefully constructed houses. The most common problem results from a change in grade as the backfill settles. After five or 10 years, almost every house ceases to have a “positive” grade; that is, the surrounding dirt no longer slopes away from the foundation. When this happens, water begins to run toward the foundation, accumulate, sink into the backfill, seep through existing cracks, and perhaps apply sufficient pressure to create even larger cracks. In older homes, the tar used to waterproof exterior walls disintegrates over time and leaves homes even more vulnerable.
Sometimes homeowners themselves, or landscapers they hire, inadvertently contribute to improper grading. If they prepare a new planting bed adjacent to walls by removing several inches of topsoil, and fill with mulch but don’t provide drainage, the result is a several-inch-deep depression beside the house topped with mulch that absorbs rain rather than letting it run off. With nowhere to go, rainwater sinks into the ground beside the house.
Other less common causes of leaks: walls settle and crack; parging or other coatings crack; gutters come loose; downspouts rust out, crack, or disconnect; exterior drain pipes get clogged with silt.

There are a number of ways to treat below-ground rainwater leakages, with advantages and disadvantages to each.
Gutters and Downspouts
The first step is to check gutters and downspouts. Even if they are not producing basement water problems, they might be causing wood rot or mortar erosion on the exterior of the house.
Clean gutters, repair holes, and make sure they slope toward downspouts and have not come loose from the house, allowing water to fall directly from the roof to the ground. Check downspouts to make sure they have not rusted out and that joints are tight—particularly at the ground-level elbow. Make sure downspouts spill water at least three or four feet away from the house. One technique is to have the water spill onto a splash block that slopes downward and away from the foundation. Another is to extend the downspout—either above ground or through an underground plastic drainpipe—and spill it above-ground onto a part of your lawn that slopes away from your house or into a storm sewer.
You can often extend downspouts for less than $15 each; gutter work can be considerably more expensive. But these improvements are almost always worth the price, even if they do not fully solve your water problem.
Grading
The next step is to inspect the soil around your house to make sure it is properly graded. To be safe, the earth should drop about one inch per foot going away from your house for about six to eight feet out from the house. The grading should consist of fill soil with a clay content of 20 to 30 percent. Don’t use sandy soil or soil containing a lot of organic matter; it will not shed water adequately.
Before adding dirt around your foundation, rake out all old mulch, leaves, and ground cover. If they are filled over, they will create a shelf that catches water.
Also take care not to smother the roots of plants in the area. Some small plants—particularly azaleas and their relatives—can be killed by even an inch of additional soil over their roots. On the other hand, large plants that have been growing by your house 15 or 20 years can probably withstand at least three or four inches of new topsoil. If you need to cover roots with a dangerously large amount of soil, dig up and raise the plants. Alternatively, if the plants are old and large, leave a low area around the roots, but circle the depressed area with a barrier.
A grading solution obviously has important advantages. It costs little—dirt, after all, is cheap—requires no great skill, and should move enough water away from your house to prevent serious harm.
If portions of your yard slope toward your house, you may have to cut a shallow ditch—or swale—to divert water before it reaches the house. A swale is a U-shaped, shallow ditch dug perpendicular to the water flow. A swale is not difficult to construct. In general, a swale should be one-and-a-half to six feet wide and just a few inches deep. It needs to be sloped from one end to the other, so that the water it catches runs away from the house. Digging a swale is more like scraping away the surface than excavating a trench. After you form the swale, plant it with grass seed or ground cover to prevent erosion from heavy runoff. The only real cost of building a swale is your time; depending on the length, a typical homeowner may be able to do it in a couple of hours, and it rarely requires more than several days.
Regrading or diverting surface water will solve most basement moisture problems, but it may not always be the best approach. In rare cases, it costs more than other solutions—for instance, if you have to rebuild an elaborate patio that slants toward your house, or if you have to redo extensive landscaping in the problem area. Furthermore, grading is not a sure cure for leakage problems; water may be penetrating your basement from places that originate well away from your house. Finally, sometimes regrading is a relatively frail solution; a little careless digging in your garden may produce a new source of leakage just after you have installed a home theater in your basement.
Excavating, Reparging, and Exterior Drainage Systems
If regrading and other surface drainage improvements don’t solve the problem, more drastic—and expensive—solutions await.
For most homes, the next best approach is to waterproof walls from the outside. To do this, a trench is dug to the depth of the footings of affected walls. Drainage pipe installed at the bottom of the trench collects water that seeps from above and carries it to a part of your yard away from your home or into a drainage pit. The exterior walls are reparged, with the parging at the bottom of the wall thickened to form a “cove” at the footing joint. A vapor barrier should also be added to exterior walls. Sometimes an exterior sump pump is needed to shoot water collected by the drainage pipe up and out of the collection area. If so, the pump must be buried in the ground deep enough to protect it from the cold; otherwise, it might freeze up in winter when you need it most.
After installing new drainage pipe and reparging, the trench is filled with soil that is tamped down, and the surface area is regraded to improve surface drainage.
Obviously, because this procedure requires much more labor than simple regrading, it costs a lot more. Plantings beside the house may have to be removed and replanted, and walkways, driveways, patios, porches, and other structures may have to be broken up and rebuilt.
Excavating and waterproofing from the outside might be more expensive than installing an interior drainage system with sump pump (see below). But our view is that, unlike interior systems, this will actually solve the underlying problem by diverting water away from walls, rather than simply managing water that enters the home. And despite what some basement waterproofing contractors might tell you, excavation work isn’t always more expensive than the interior solutions they want you to buy.

Interior Sump Pump
Improving exterior drainage with better downspout placement, regrading, excavating, or a combination of these approaches resolves the vast majority of water seepage problems. But in some cases the problem must be addressed inside the home.
A relatively simple interior solution is to break a hole in the basement floor where water collects and dig a “sump pit” (also called “sump crock,” “sump well,” or “sump”) about two feet below the lowest part of the basement floor slab. A liner is placed in the sump pit and a pump is installed that goes on whenever the water in the sump pit reaches a certain level. The pump connects to an electricity source (usually an existing outlet), and a pipe is run from the pump up and through a wall to be discharged onto the ground outside and flow away from the house.
In this simple system, water that collects under the floor slab should find its way to the sump pit. If it works well, the sump pit and sump pump relieve pressure on both floor and walls. You can aid this relief by drilling holes into (but not all the way through) hollow block walls just above floor level to allow water that accumulates inside the wall cavity to drain out.
The main advantages of this approach are that it is relatively inexpensive ($1,000 to $2,000 to install a single sump pit and pump) and minimally disrupts interior and exterior structures. And if it doesn’t work, the sump can be used in a more elaborate interior drainage system.
The main disadvantage is that it may not solve the water problem. Water from other parts of the floor area or from outside the walls may not find its way to the sump pit. And the pump will wear out—sometimes in less than 10 years.
Because the sump pump is plugged into an electrical outlet, it won’t work during power outages—perhaps during heavy rainstorms when you need it most. If your basement is finished or contains valuables, consider paying an extra $500 to $1,000 for a sump pump with a battery backup system.
Once a sump pump is installed in your basement, periodically test and maintain it. Activate the pump (during dry spells) by pouring water into the sump pit. If it doesn’t turn on, it may be clogged with silt or burned out. Unplug the pump, remove it from the pit, and scoop out any silt (it’s fun for the whole family). After you clean out the silt, put one or two bricks in the bottom of the pit to allow more space for silt to accumulate. Reinstall the pump and retest it by pouring water into the pit. If it still doesn’t run, replace it.
Interior Drainage System
One way to make sure water finds its way to a sump pit or other discharge point is to build a drainage system. The floor is broken up around part of or, depending on the extent of symptoms, the entire basement perimeter. A channel is dug beside the inside basement wall and connected to a discharge point. If the house has hollow block or brick walls, holes are drilled through the interior surface of the blocks to allow water from outside to pass into the hollow cores and drain out through the inside surface into the channel below the floor slab. If the house has poured concrete walls, holes are drilled between the walls and the footing. The drainage channel is filled with coarse gravel covering a four-inch perforated plastic drainage pipe located above or beside the footing that leads to the discharge point. The floor above the channel is then patched. This system can rely entirely on having water pass from the outside through or under the foundation to relieve pressure on outside walls.
An interior drainage system is most often used in combination with a sump pump, with the channel merely carrying water to the sump pit. But no sump pump is necessary if a drainage pipe can be passed through the foundation below floor level and run to a storm sewer or low place on the property where water can spill into the open.
The main advantage of an interior drainage system is that it is likely to work. Even though it won’t keep water from leaking through your basement walls, the system keeps the basement dry by collecting the water and pumping it out. Other than sump pump failure, about the only other risks are that the pipes will get clogged with silt or break. Such risks are minimal unless walls are seriously cracked, water flow is very heavy, or the structure undergoes excessive settling.
The major disadvantages of interior drainage systems are that they are expensive and sometimes require destruction of cabinets, paneling, flooring, and other expensive features of the home. In addition, when used with a sump pump, there is the risk of pump failure (a good reason for getting a pump with battery backup for finished spaces). And, as already discussed, interior systems don’t actually solve the problem of excessive water collecting next to exterior walls—they simply manage it.

Waterproofing Paints and Sealing Cracks
Sometimes very mild seepage problems can be solved—temporarily, at least—by applying waterproofing paint to interior walls or sealing cracks. They can be applied only on sound walls that have been properly prepared according to the product’s instructions. This is a simple, cheap approach—but it usually does not work. Paints and sealants don’t divert water away from walls, and you’ll probably have to retackle the problem later.
In addition to problems from rainwater that permeates the soil and then seeps or leaks into the basement, there are other possible causes of water problems, each with its own cure.
Leakage of Surface Water
Generally, it’s easiest to detect and cure leakages from roof and yard runoff directly through above-grade cracks in walls, under doors, or around windows.
You may be able to redirect the water on the yard surface so that it bypasses your house—to find out whether this is possible, watch your yard during a heavy rain. If you see sheets of water running on the surface of the yard toward your house, it probably means your yard is not sloped properly and may be draining too large of an area, perhaps even adjoining properties. If this is a new problem, find out if your neighbors have recently done any major regrading or landscaping.
You can redirect surface drainage by regrading or digging a swale (discussed above) to catch and channel water away from your house. Depending on the entry path, you can also point up walls, caulk windows and doors, install window wells, build up window sills, or build low barriers at doorway footings.
Leakage of Groundwater
The most difficult-to-solve leakage problem is groundwater—that is, water that seeps in from the permanent water table beneath your house. If infiltration of water into your basement occurs several days after rainfall, or absent rainfall, you might have a groundwater leakage problem; if your basement gets wet only during or after rainfall, groundwater is not to blame. While a groundwater leakage problem will probably require an interior and/or exterior drainage system (see above), first obtain professional advice from a home inspection specialist. Note that—despite what some basement waterproofing companies might tell you—this problem is very rare.
Surcharge
Sometimes water comes up through a backed-up floor drain or from an outside storm drain. This is called surcharge, and may occur if the drain is connected to a sanitary sewer or public storm drain system. If you think surcharge may be your problem, contact sewer authorities. First, have them test the water to make sure it does not come from a sanitary sewage system. Then check nearby storm drains and catch basins for blockages. To solve surcharge problems, you may have to find an alternative way to discharge your floor drain. One possible solution, a one-way discharge valve (or “backflow preventer” or “check valve”), has fallen into disfavor in many areas because it catches debris and clogs up. Another solution is to simply close off your floor drain.
Condensation
A different source of basement water is condensation of moisture from the air. If walls, floors, or pipes are cold, and the air entering the basement is warm and high in humidity, the cold surfaces can become wet. You can sometimes solve the problem by insulating water pipes and keeping windows closed during summer except when it is cooler outside than inside. For the most severe problems, however, you will also need to install a dehumidifier, air conditioner, or both.
Once you decide on a solution, how do you get the work done?
You can probably make gutter, downspout, and grading improvements on your own.
For downspout work, you can buy downspout pipes and joints, flexible plastic drainage pipe, window wells, transparent window well covers, and other materials from home improvement stores. If you want expert help with downspouts or gutter work, check our Gutter Cleaners and Gutter Installers sections for comments and ratings of local companies.
For grading work, you can do it yourself, hire landscaping companies (see our Landscapers section), or consult companies that specialize in drainage work. Before hiring a contractor, have several companies send out estimators to look at your problem and provide proposals and price quotes.
If you want to install a sump pump or two without perimeter drainage piping or other features, use a plumbing contractor. Many plumbing outfits offer free estimates on sump pump installations, with prices usually ranging from $1,000 to $2,000. Many of the companies listed in our Basement Waterproofing section also install sump pumps—but be warned that some might try to sell you more work than you need.
If your problem is intractable enough to warrant an interior or exterior drainage system, you probably need to hire a basement waterproofing contractor or drainage specialist. The ratings and comments from our surveys of area consumers (primarilyCHECKBOOK and Consumer Reports subscribers) shown in our Basement Waterproofing section will help you get started.
Be warned: If you do need to hire a waterproofing contractor, get proposals from more than one. We find that different companies may propose drastically different— and in some cases costly and unnecessary—solutions. Don’t let them pressure you into a decision.
When you review ratings of basement waterproofing contractors, keep in mind a critical distinction: Ratings and comments tell you how satisfied (or dissatisfied) customers have been with the work. The problem is that some companies do an unnecessary job well, and may not have recommended the least expensive or best solution. If homeowners go for high-priced cures and they work, a company will score high in terms of customer satisfaction but may be a bad place to go for advice.
Many basement waterproofing contractors primarily install—and almost invariably propose—interior drainage systems with sump pumps, rather than regrading or excavation work. Why? Aside from the somewhat obvious reason that installation of interior drainage systems and sump pumps generates a lot more revenue than applying a few inches of topsoil, regrading and excavation work takes more expertise to do right. And even done right, it isn’t foolproof. Regrading and excavation work doesn’t always solve leakage problems right away; additional work may be needed to perfect it. On the other hand, jackhammering floors along the base of interior walls, installing drains, and directing water flow to a sump pump takes little expertise. It’s also easy to guarantee, and guarantees sell. Drainage specialists, on the other hand, sometimes have to try one approach, wait to see if it works, and if not, try something else. It’s why the few basement waterproofing contractors that actually perform exterior work usually won’t guarantee it.
When choosing any contractor, check its schedule of payments. A payment schedule that allows you to pay most or all of the cost of a job after completion gives you leverage to make sure it’s completed promptly and neatly. The best arrangement is to hold final payment until after the first heavy rain, when you can find out how well the job holds up.
If you must install an interior system, compare the guarantees offered by companies that bid on the work. Of course, a guarantee should protect you if the system doesn’t work—but you still have to enforce it. In this field, don’t be too impressed with long guarantees. If a company goes under, its guarantee won’t do you much good—and waterproofing companies go under all the time.
Also, beware of technicalities in guarantees. Some impose an annual fee to keep the guarantee in force—an easy-to-overlook requirement. In addition, warranty coverage of sump pumps varies. Some warranties cover the pump for as long as they cover the underground system—perhaps five years or more; some cover it for a year or less.
Woe to the CHECKBOOK staffer with a water problem in his basement.
Soon after he and his wife bought their Arlington home, CHECKBOOK’s executive editor discovered a significant water problem in his basement garage. (Nice work there, Mr. Home Inspector.)
After taking basic steps (cleaning gutters, extending downspouts) to eliminate the problem, he decided to take one for the team and get bids from local basement waterproofing contractors. In the end, our editor decided that sometimes being a team player stinks.
We’ve included below the work proposed by each company our editor contacted, and its price to do it. As you can see, the companies proposed dramatically different work at dramatically different price points ranging from $2,500 to $12,324.
Only three of the companies—B-Dry, Desert Dry, and Newborg Drainage & Landscaping—offered to correct the problem from the exterior. B-Dry’s proposal listed exterior excavation as a (very costly) option, but its estimator never discussed it and its proposal provided no details on how the work would be done. Desert Dry’s representative discussed exterior waterproofing as an option, but later decided it would be more cost-effective to build an interior system. Of these three companies, only Newborg deemed addressing the problem from outside the home the best available option.
Company representatives evidenced highly variable levels of expertise. Some inspectors spent over an hour reviewing the site, asking questions, drawing up plans. The representative for MER/Morrison, on the other hand, spent about two minutes measuring the garage and never inspected the exterior of the home to determine the cause of the leakage.
Two of the companies—Aquaguard and Mid-Atlantic Waterproofing—proposed doing work that, in our view, exceeded the requirements of the job. Aquaguard recommended installing an interior drainage system along 35 feet of the walls; Mid-Atlantic recommended an interior drainage system along 45 feet of the walls, and warned that the garage walls were unstable and needed reinforcement with additional materials. The other companies that recommended interior drainage systems proposed installing them only along walls where leakage was evident—14 to 16 feet of the walls, depending on the company.
Two companies—again Aquaguard and Mid-Atlantic Waterproofing—resorted to aggressive and, in our view, deceptive sales tactics (see write-ups on pages 50 and 51 for details).
This type of selling practice is not new to us. In our report on basement waterproofing contractors 10 years ago, we related the experiences of a CHECKBOOK member who asked Mid-Atlantic to bid on a basement waterproofing job. Mid-Atlantic initially quoted a price of $9,783 to do the work it proposed, but later offered to do the work for $7,331.
Fifteen years ago, Mid-Atlantic gave a different CHECKBOOK member an initial bid of $11,610 to fix his wet basement. A few days later, a different Mid-Atlantic representative who visited his home suggested slightly different work specifications which reduced the price by more than $1,000. When our member remained undecided, the representative put him on the phone with someone at the Mid-Atlantic office who told him they could do the job for $4,999—if he signed the contract at once and agreed to have the work start immediately.
As you can see from the write-ups below, the selling practices of Mid-Atlantic—and Aquaguard—now include asking customers to schedule additional meetings with “chief inspectors” to discuss modifications to job proposals that might produce cost savings. In our editor’s experience, these chief inspectors were sent not to provide expert opinions but to provide additional opportunities for their high-pressure sales pitches.
Two-story brick-and-block colonial-style single-family detached structure. Two-thirds of the basement is finished space, the other third an unfinished area used for furnace equipment, storage, and laundry room. Adjacent to the laundry room is a single-car basement garage. All but about two feet of the garage is located below grade. Above the garage is a den/library that had once been a screened-in porch. At the rear of the garage there is a small tool area. Behind and above this tool area is a deck.
Beside and above the basement garage is the next-door neighbor’s poured concrete driveway, with a two-foot-wide planting bed between the driveway and the wall of the garage.
For several years, during moderate or worse rains, a significant amount of water has leaked through the block walls located at the back of the garage in the tool area. Most of the water originates from the corner located near the neighbor’s driveway.
Without disclosing his affiliation with CHECKBOOK, our editor asked six companies to send someone to inspect the problem and propose permanent solutions.
Aquaguard
Proposed work:
· Install 35-foot drain system along bottom of interior walls of garage, including excavation of a trench along the base of the walls, drilling weep holes into the blocks, and running drains to an excavated sump pit. Excavated areas would then be covered with new concrete.
· Install sump pump with highly recommended battery backup in new pit.
· Install buried discharge line through back wall to backyard.
Price: $6,858
Following a lengthy sales pitch, after which our editor informed the representative he wanted to have additional companies look at the project, the company’s representative consulted his calendar and offered to do the work for $6,101 if our editor accepted the proposal and “grabbed the open date.” The rep also offered a $500-off coupon that couldn’t be used to further reduce the schedule-related discount.
The next day, another company representative left a voicemail message saying he had “some really exciting news” regarding the estimate. The day after that, yet another company representative called to “check in to make sure the inspector answered all your questions,” and then asked why our editor didn’t accept the proposal the day it was provided. After our editor explained that he wanted to speak with other companies, he was told that the production managers had discussed the job and that the company’s chief inspector—“who has the most experience here and would have the greatest ability to determine pricing and might be able to save you money”—wanted to meet with him.
A few days later, our editor met with the chief inspector. Upon arriving, the inspector sat down at the dining-room table, requested a glass of water, and asked to see his company’s proposal because he “hadn’t had a chance to look at it.” He then asked why our editor hadn’t accepted the proposal. After our editor explained that he wanted to get proposals from other companies, the inspector spoke at length about how other companies didn’t do the work properly, that Aquaguard’s method was superior to the others, and that our editor shouldn’t bother with any of the rest. He asked several times what he needed to do to get our editor to sign the proposal, and offered to inspect the job and provide an amended proposal—but only if our editor agreed to have Aquaguard do the work.
After our editor told the inspector he welcomed the inspector’s insights about the specifics of the job but would not sign any proposal that day, the inspector became irritated, told him he “should talk to 100 companies” about the job, and left without ever entering the basement or garage.
Three weeks later, another Aquaguard sales agent called and, like before, said the company’s chief inspector wanted to meet with him to discuss the job. When our editor asked why another inspection was required, given that two inspectors had already visited his home, he was given almost word for word the same reasons as during the previous phone call. After our editor explained that the last inspector didn’t even look at the garage or basement, the caller said that, according to the inspector’s notes, he did look at the project and had authorized a discounted price of $4,987. Our editor asked that a manager or the owner call him.
Later that day, a manager called to apologize. Our editor asked him if this is Aquaguard’s usual way of doing business—sending additional salespersons under the guise of doing further inspections but actually just making more sales pitches. The manager didn’t deny that this is their usual practice, but explained that the company works hard to earn customers’ business and the inspector shouldn’t have left without looking over the work. The manager offered to visit our editor’s home, inspect the job, and provide a discounted price for the work, but our editor declined and asked Aquaguard not to call him anymore.
B-Dry
Proposed work:
· Install 16-foot drain system along bottom of interior walls in northeast corner of garage, including excavating a trench along the base of the walls, drilling weep holes into the blocks, and running the drains to an excavated sump pit; excavated areas would then be covered with new concrete.
· Install sump pump in new pit. For an additional $935, would install sump pump with battery backup (but not recommended for this job).
· Install 40-foot buried discharge line.
· Install 80 square feet of rigid sealer on walls.
Price: $3,437 (not including option for sump pump with battery backup for an additional $935)
Proposal listed a not previously discussed second option for excavation and exterior waterproofing work for $14,172, with few details of how work would be performed.
Desert Dry
Proposed work:
· Install 14-foot subfloor pressure relief system along foundation walls in rear of basement garage.
· Flash walls with MiraDRAIN up to brick border.
· Install sump pit and sump pump.
· Run sump discharge to daylight/best location.
· Company’s representative discussed solving the problem via excavation and other exterior work, but, after a few days of reflection and studying requested pictures of work area during a rainstorm, deemed interior drainage option as more cost effective and therefore preferable.
Price: $2,500
MER/Morrison
Proposed work:
· Install interior pressure relief system along 15 feet of rear walls of garage.
· Remove floor eight to 18 inches from wall, dig a trench, weep cinder blocks, install filter fabric, install perforated pipe and cover with stone, and cover trenches with new concrete.
· Connect new drainage lines to newly installed sump pit with sump pump.
· Install drain in front of the door leading from garage to laundry room.
· Install discharge line through back wall of garage to evacuate accumulated water into backyard.
Price: $2,875
Mid-Atlantic Waterproofing
Proposed work:
· Install 45-foot interior drain system along bottom of all walls in garage.
· Install spacers, Midalizer, Mida Scent, Mida-Aire, and Mida Hydro-Trac, and install ADS perforated piping to carry water away to two newly installed sump pits. Excavated areas would then be covered with new concrete.
· Install two sump pumps with battery backups in new pits.
· Install buried discharge line to evacuate accumulated water through back wall of garage into backyard.
· Inspector expressed great deal of concern that garage walls are unstable, and proposed reinforcing them with 22 feet of Mida Fiber Lock Crack Repair.
Price: $12,324
A few days after submitting the above proposal, a Mid-Atlantic representative called our editor to ask if he had accepted the proposal or planned to accept it soon. When our editor explained he wanted to take some time to meet with other companies, he was told that Mid-Atlantic’s chief inspector wanted to meet with him to discuss the proposal, review the job, and possibly reduce the price. When our editor asked why the chief inspector was interested in his job, he was given a pitch (almost identical to Aquaguard’s) that the production staff had reviewed the initial inspection and thought significant cost savings could be realized.
When our editor met with Mid-Atlantic’s chief inspector the next evening, the inspector spent the bulk of his time pushing Mid-Atlantic’s services, rather than inspecting the premises. After much discussion of whether our editor was willing to engage his company that night, the chief inspector reluctantly looked at the job. He found that the walls did not need to be reinforced (he diagnosed that the cracks were caused by 70 years of settlement and frost lines) and that only one sump pump was needed for the company’s drainage system. He provided a revised proposal with a new price of $8,758.
Over the course of the next two weeks, our editor received additional calls from Mid-Atlantic. Each time, after explaining that he wanted to get proposals from additional companies, he was told that Mid-Atlantic’s chief inspector wanted to meet with him, review the work, and suggest possible cost savings. When our editor explained the company’s chief inspector had already done this, each time he was told that Mid-Atlantic really wanted to earn his business by offering additional discounts. When our editor asked why a revised price couldn’t be provided via phone, since the company’s chief inspector had already looked at the job, he was told that company policy required in-person meetings. Each time, our editor declined to hold additional meetings.
Over the course of the next three months, Mid-Atlantic repeatedly tried to phone our editor. During his four last conversations with Mid-Atlantic sales agents, the pitch changed slightly: They told our editor that, to celebrate the company’s 40th anniversary, its owner had authorized discounts to all potential customers. During each call, our editor was told that to get this discount, he had to meet with the company’s chief inspector, who wanted to review the job. Each time, our editor declined to hold additional meetings.
During his eighth phone conversation with Mid-Atlantic, which again requested that he meet with its chief inspector, our editor told the company he had selected a different company to do the work and asked them to stop calling.
Newborg Drainage & Landscaping
Proposed work:
· Excavate six-foot-deep, three-foot-long area at back corner of garage where seepage occurs.
· Point up cracks in wall and waterproof/seal exterior wall.
· Install drainage pipe at bottom of excavation and direct flow to a constructed discharge area in backyard.
· Refill hole and regrade area so runoff flows into a newly formed surface channel drain toward slope in backyard.
· Fasten downspouts on northeast corner of house to solid flexible pipe; bury pipe and run to discharge area in backyard.
Price: $3,650
Note: Company charges a $75 consultation fee that is waived if customer contracts for further work. Owner reported he also waives this fee if the company proposes work it does not normally do or suggests work that is done by the homeowner.
Because our editor wanted his problem solved by improving drainage outside his home, and because Newborg Drainage was the only company interested in doing that type of job, our editor selected Newborg. (His choice was influenced by the high ratings Newborg receives from its surveyed customers at Checkbook.org.)
Newborg completed the work in one day. A few weeks later, after heavy spring rains, our editor discovered that there was no leakage in the back corner of the garage, but that minor seepage still existed along the back wall of the garage. Newborg returned and installed a vapor barrier over a small depressed area underneath the deck behind the garage and cleaned out drains underneath the deck.
Problem solved.
No comments:
Post a Comment